Since doing the April 2015 income report with our Pinterest “study” where we found that, on average, long Pinterest images got 70% more repins that short Pinterest images, we’ve gotten so many requests for a tutorial on creating these long Pinterest-style images and how to hide them in a post. These requests combined with my desire to teach and feeling really cool that I know SOMETHING about code led me to record a few video tutorials. 📹
So here we go!
Why Hide a Pinterest Image?
Okay, so just a quick recap – why do these long Pinterest images matter? Even if we don’t personally like them (hi!) or know that they might not always be effective or relevant based on how Pinterest could make display changes that are out of our control — still, in my opinion, it’s important to know how to create and use these types of images because right now we see them being highly effective.
- They stand out in the feed.
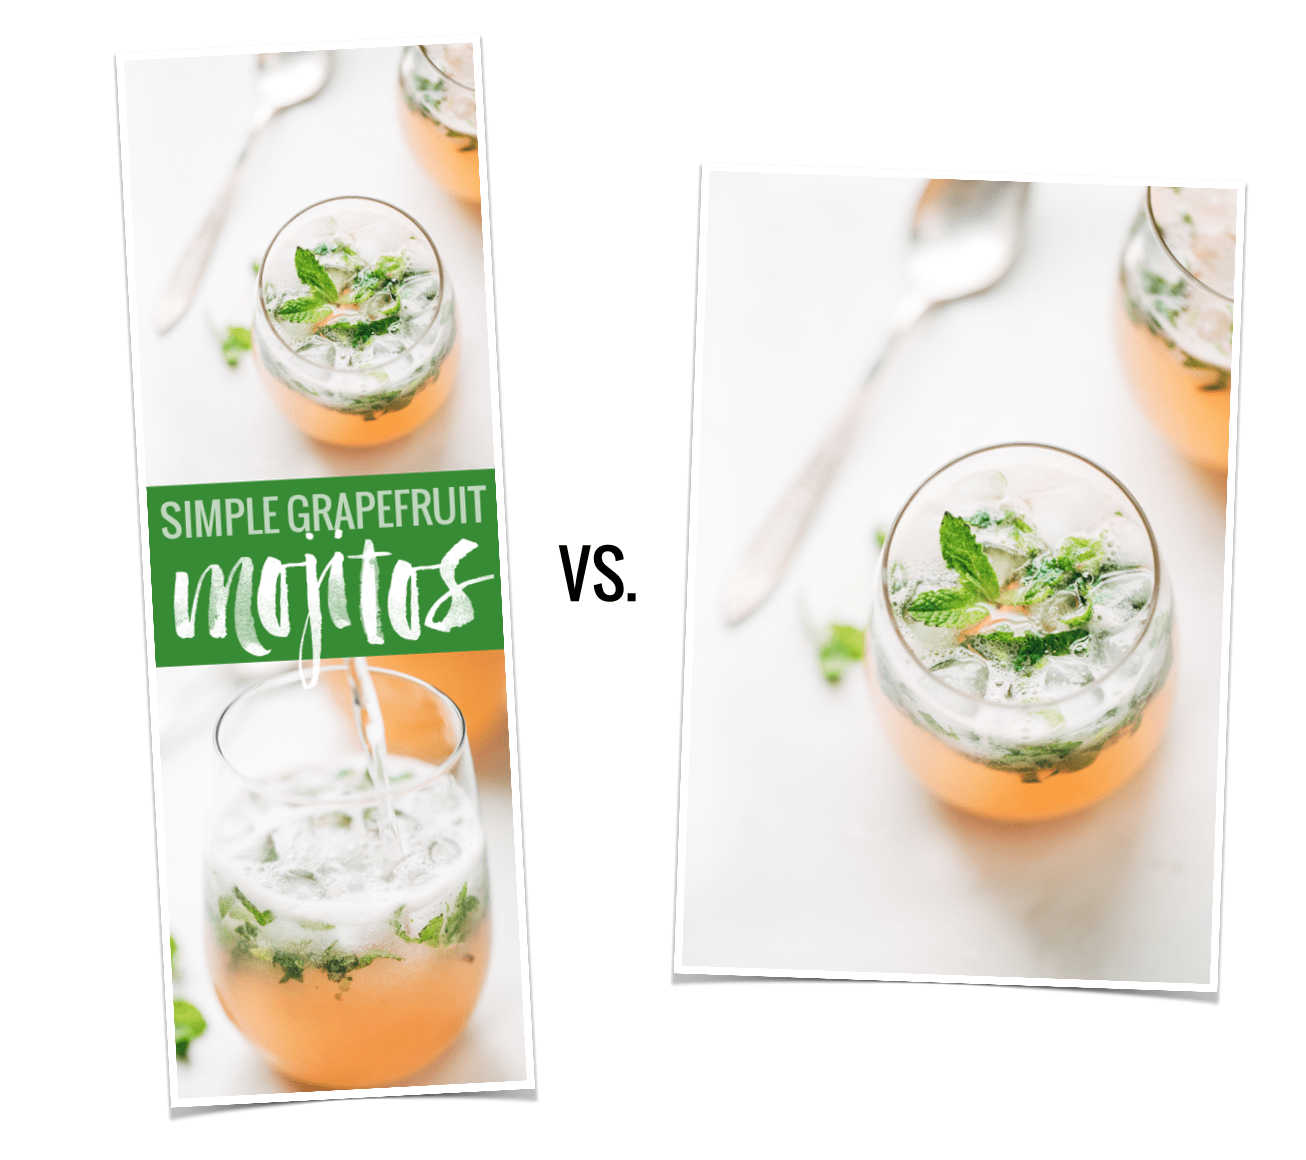
- They stand out in search results. Look at the image above – where do your eyes go first? there are two Pinch of Yum images in that window, but the one with the orange box of text stands out a lot more than the original “short image.”
- They give your existing content a new “face.” They allow you to share and show off the same awesome content in more than one way.
- They can help you create a branded look and feel.
- Right now, according to our experiment looking at about 500 images and accounts with a total combined following of almost nine million users, long text-based images are getting 70% more repins than traditional images.
So yes, I think for right now, they do matter.
Let’s jump into the good stuff now, shall we?
👻👻👻👻👻👻👻
How To Make a Custom Pinterest Image
Video here! 👇
How to make a Long Pinterest Image in Photoshop (8 MINS):
And general overview screenshots here 👇 in case you don’t want to hear my voice talking about Photoshop. It’s cool. I can deal.
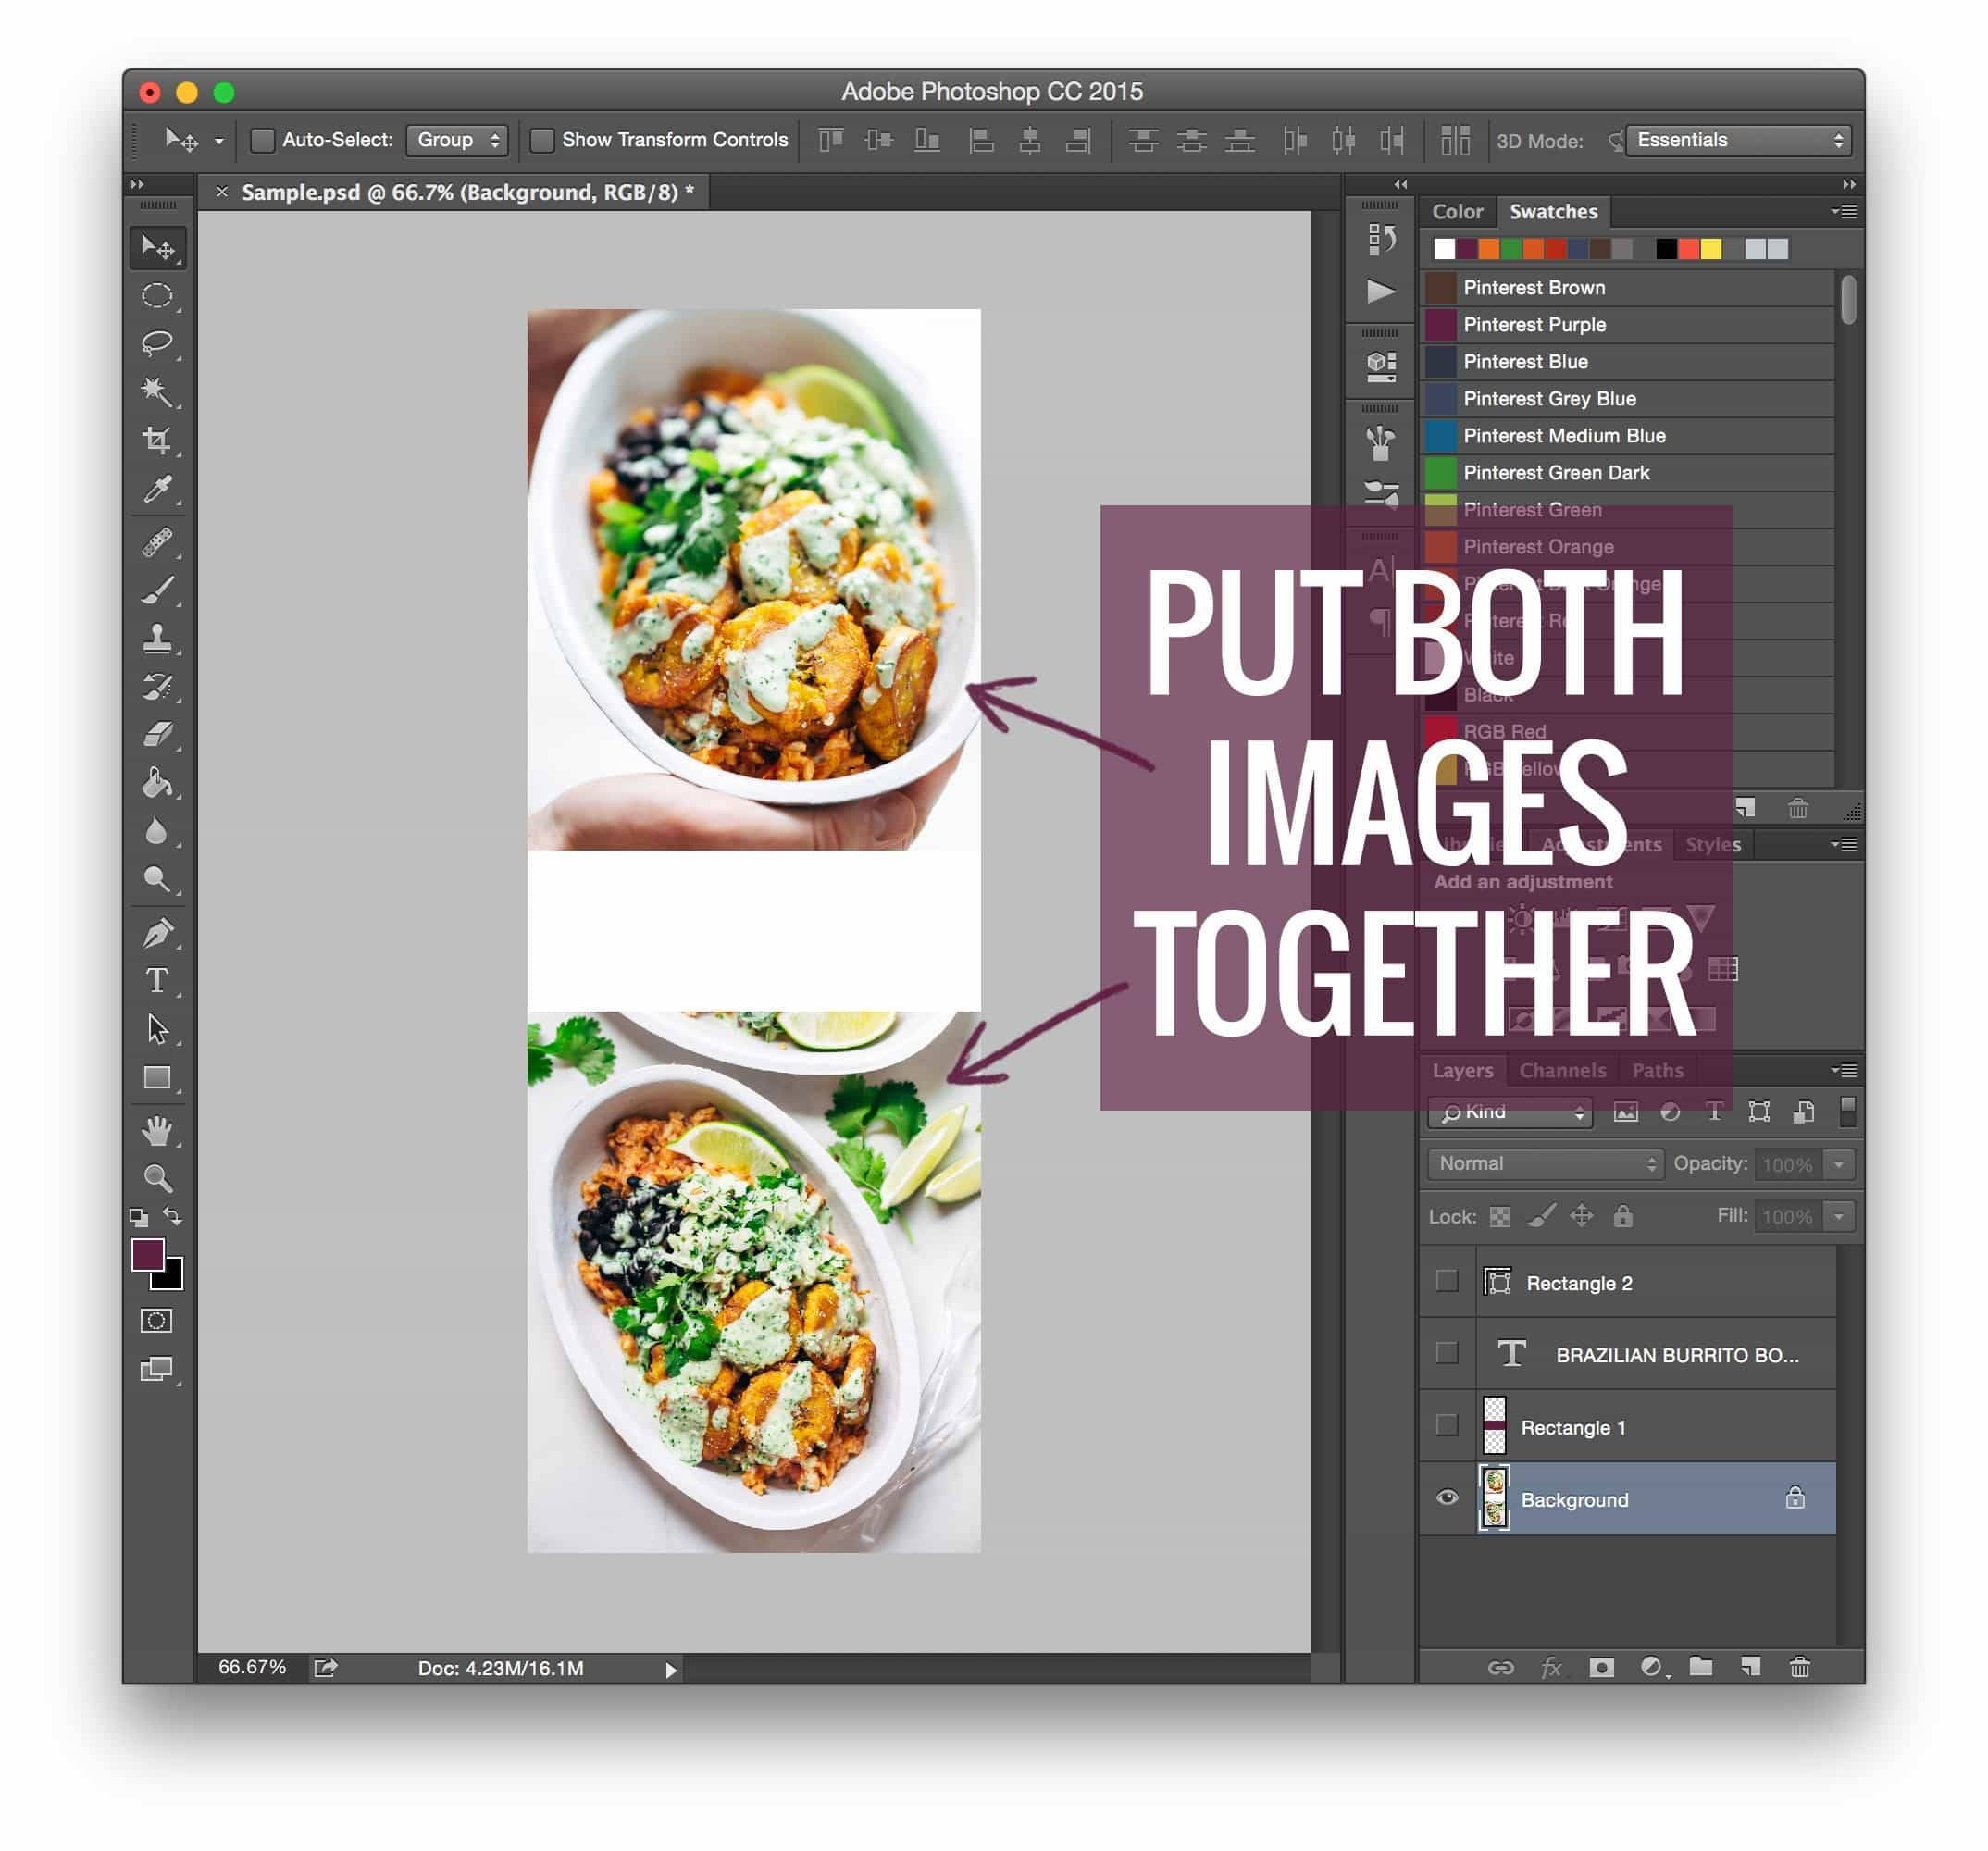
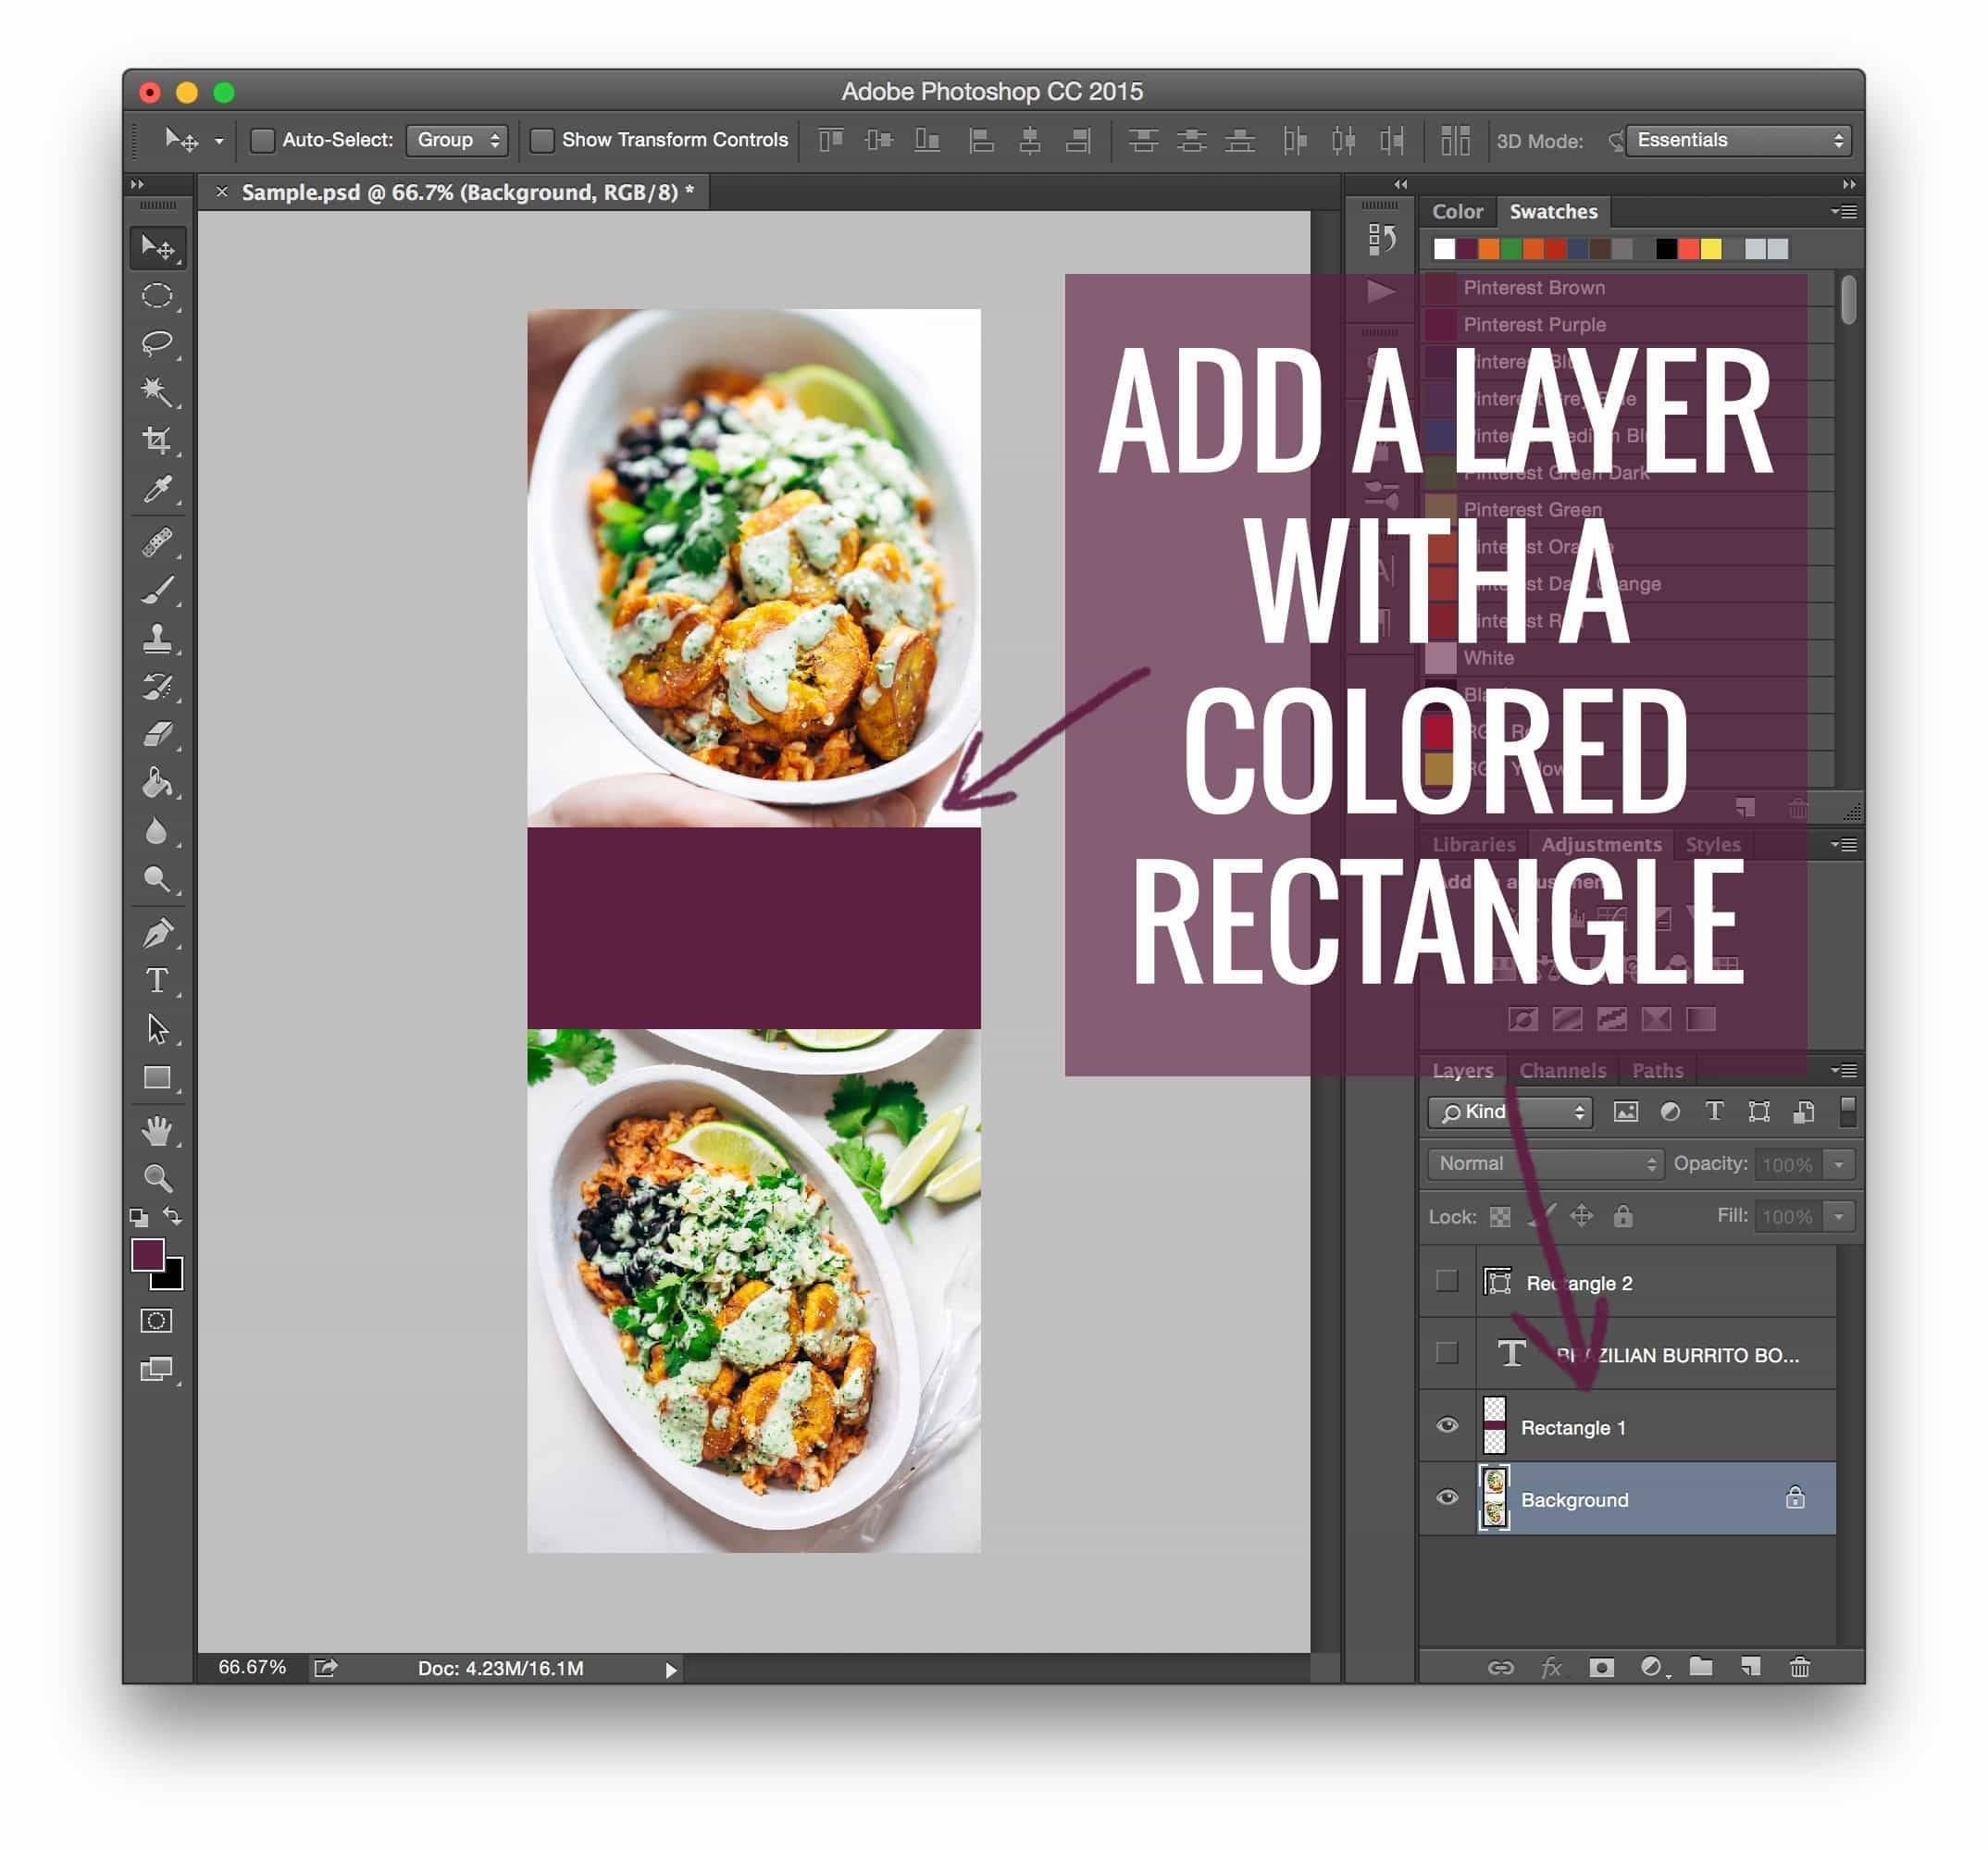
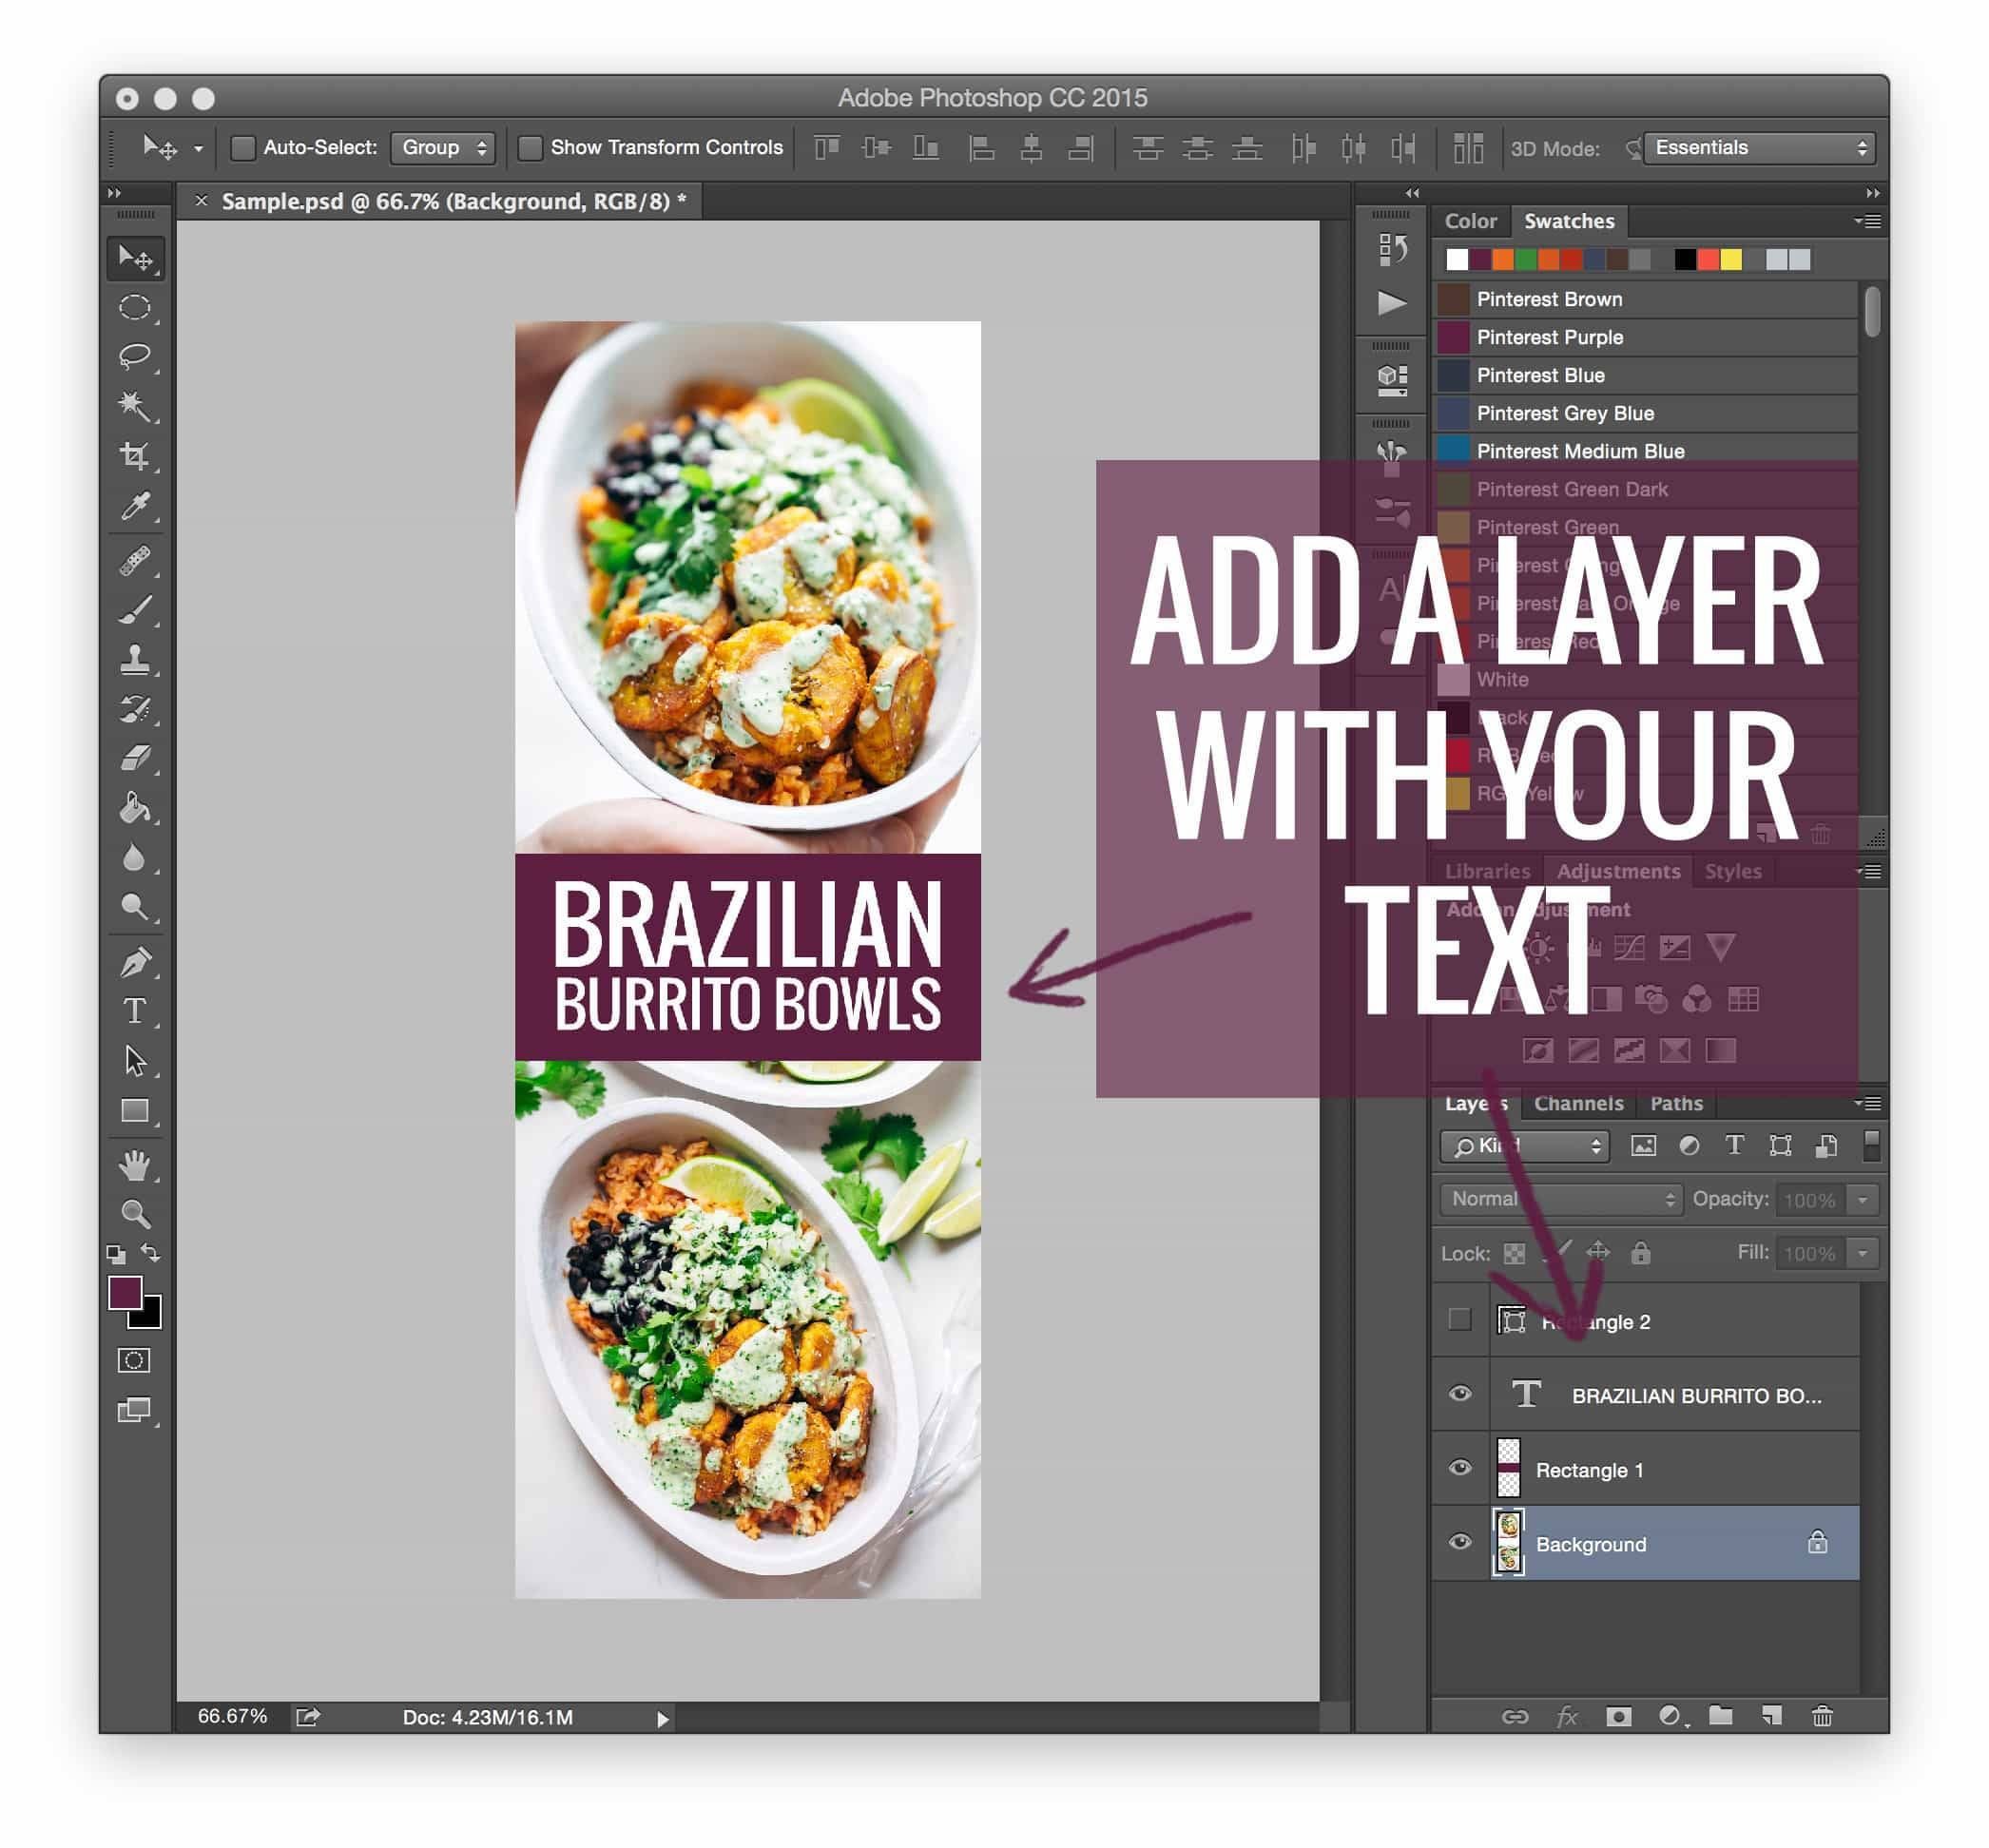
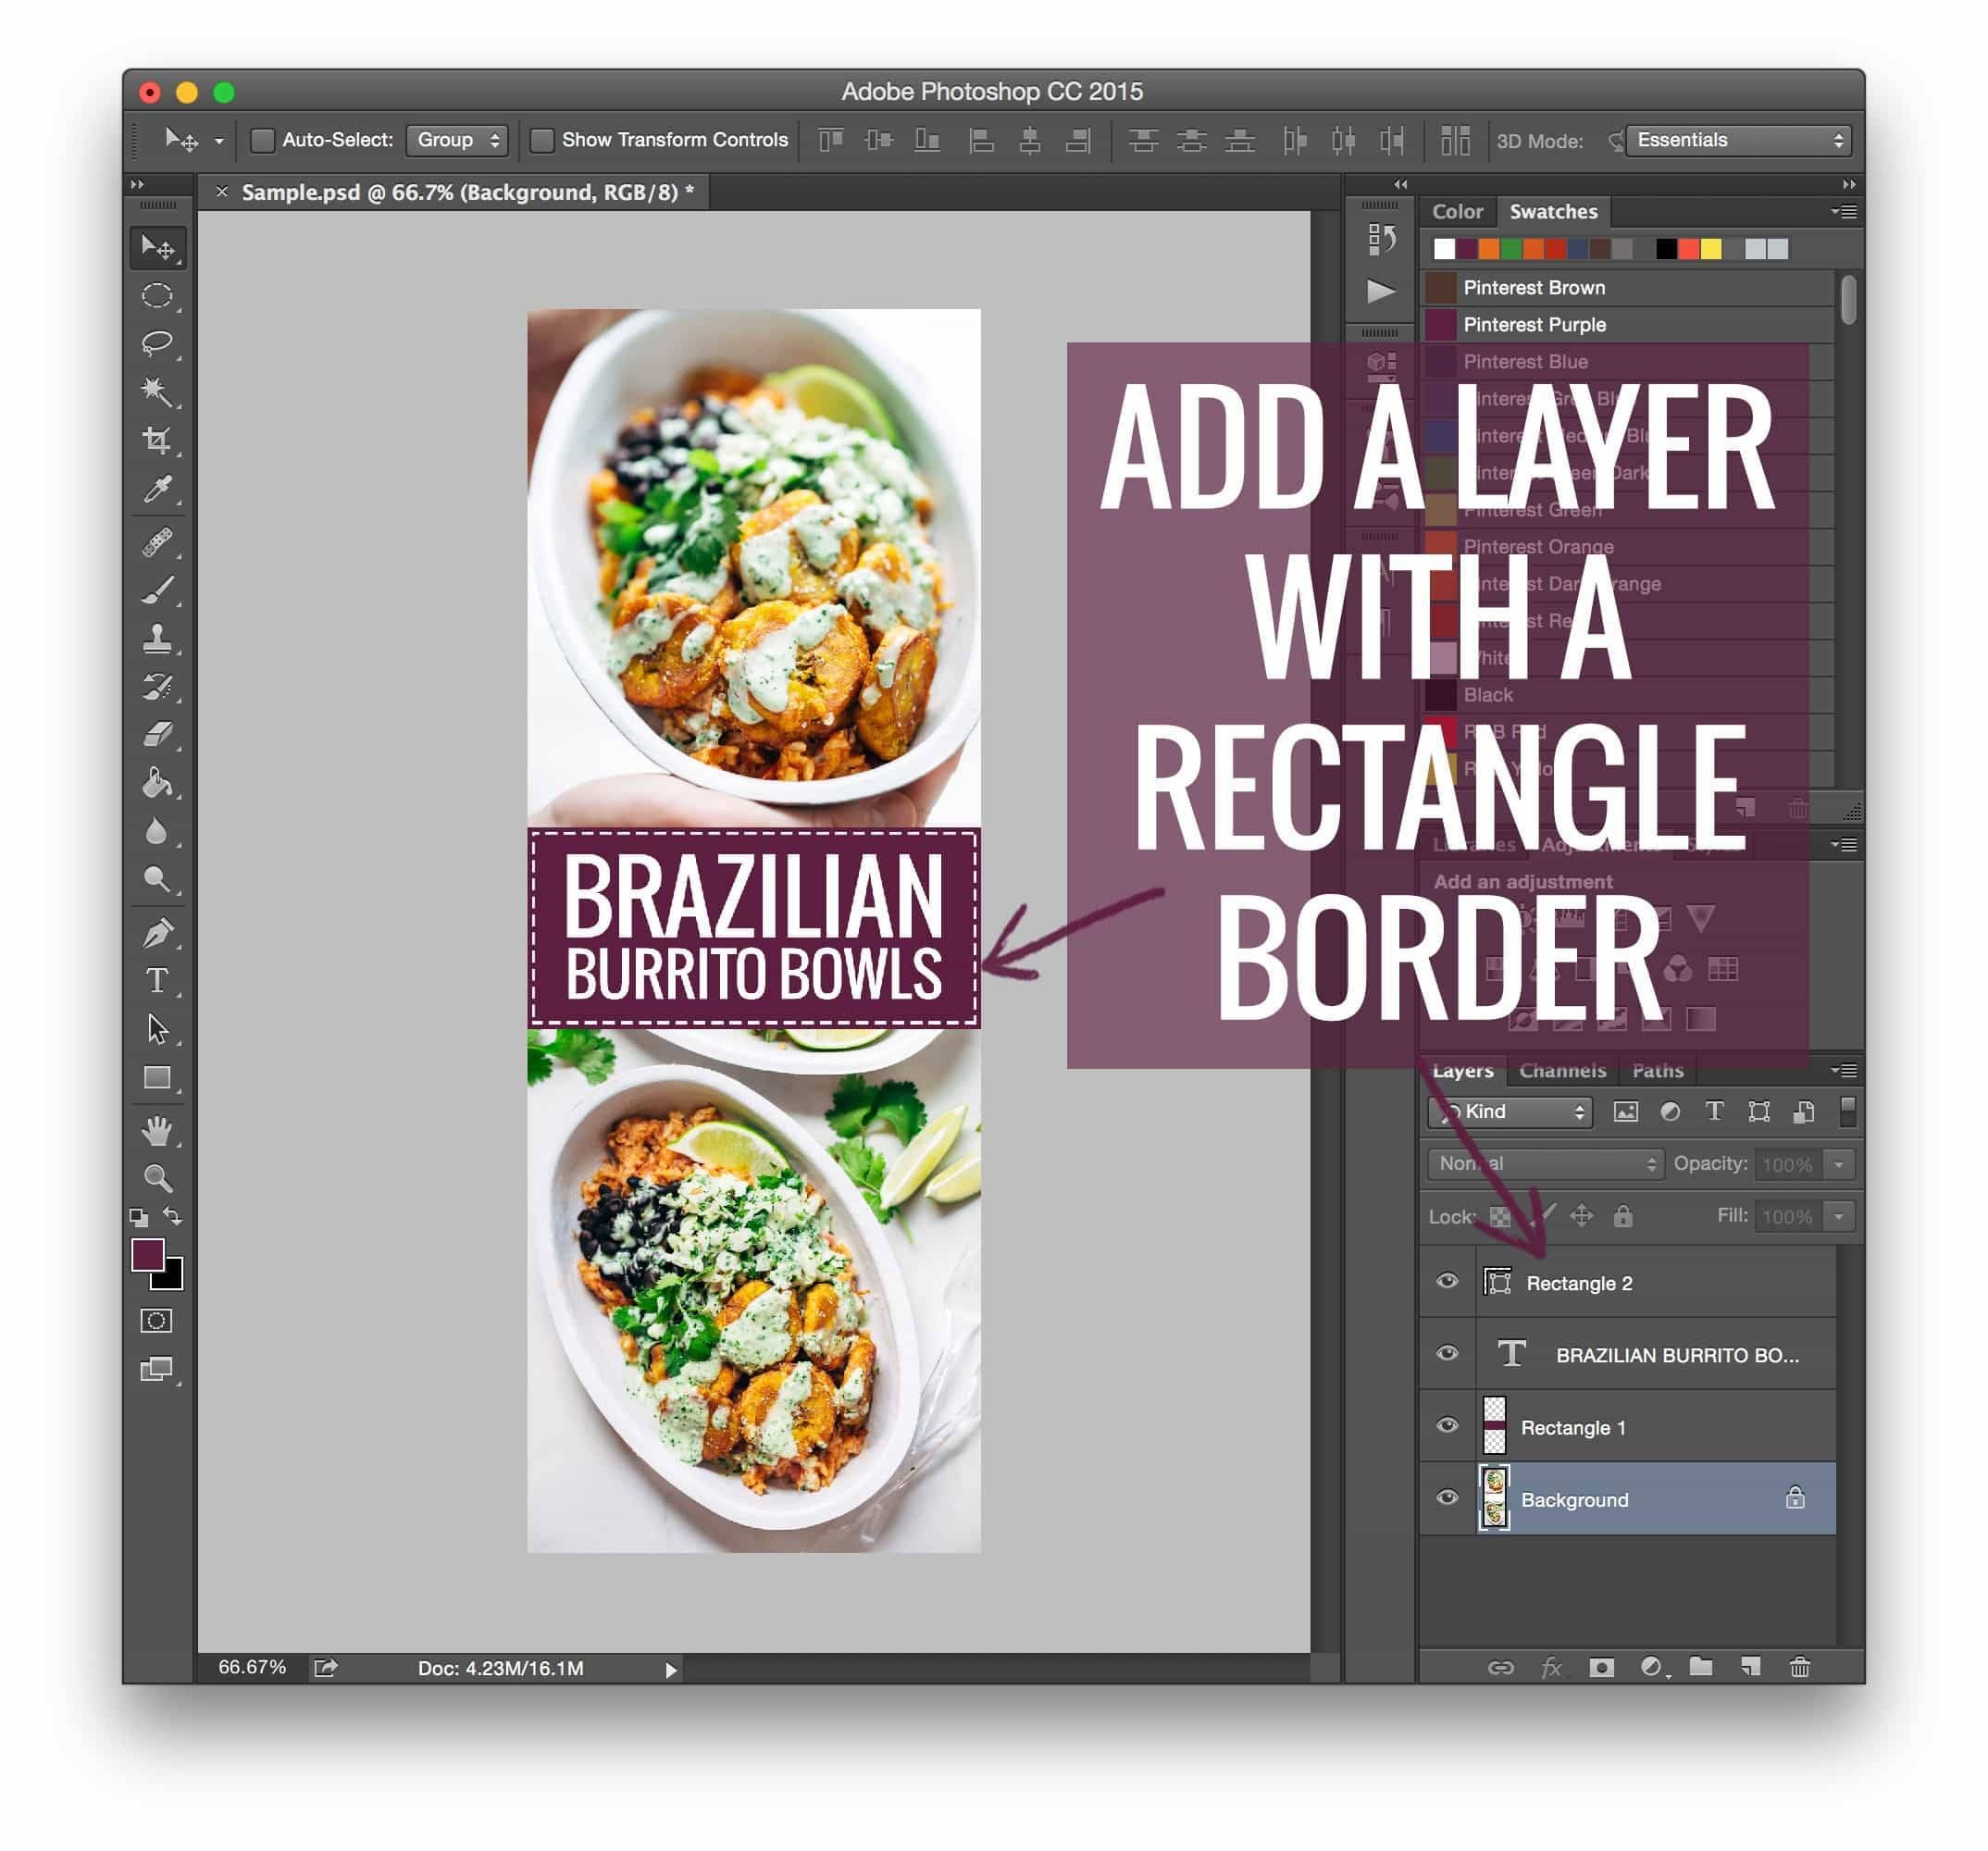
This tutorial is not the end-all-be-all of Photoshop’s capabilities – it’s just showing you how we create our Pinch of Yum long image style, which, obviously, includes the colored rectangle, text, and dotted line frame.
Photoshop is incredibly versatile, much more so than a site like Canva or PicMonkey (which are also good places to start! but not nearly as flexible), so I’d encourage you to use this “style” as a starting point if you need something to get you going, and then keep playing until you find something that feels perfectly tailored to your brand!
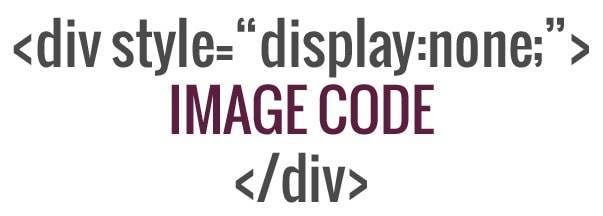
How To Hide a Pinterest Image On a Blog Post
UPDATE: At Pinch of Yum, we no longer use the method below to hide our long pins on posts. We now use Tasty Pins from our WP Tasty team. We found that because we were doing it so often, we wanted an automated and reliable way to hide the images instead of having to deal with the code below. Learn more here!
Now for the coding magic!
Video here! 👇
I will just add that there are several ways to do this – all of it, from creating the images to hiding them – and if you would like to share something that you know of that works really well right down there in the comments, I’d be super pumped.
Because we are smarter than I! A rising tide lifts all ships! 💪
I am SUCH an elementary school teacher right now.
If you’re interested in learning more about some of the ways that you can monetize a food blog, we encourage you to download this free ebook, “ 16 Ways to Monetize Your Food Blog,” from our sister site, Food Blogger Pro!

Answers To Questions
Question: Why would you want to hide a Pinterest image?
Answer: Sometimes bloggers want to have the long images as an option for pinning, but they don’t like the way the long, text-heavy images look in a post.
I feel this way for sure – it doesn’t really fit my style of blog content to all of a sudden throw an image in the post that is a collage with text. It’s too long, too big, and awkward looking. When all my other images are text-free single photos, it just doesn’t make sense with the “flow” of my posts to throw a long one in there.
But that is definitely dependent on the individual blogger. Some people may find that fits their style, and as a result, they can just display all the images as normal.
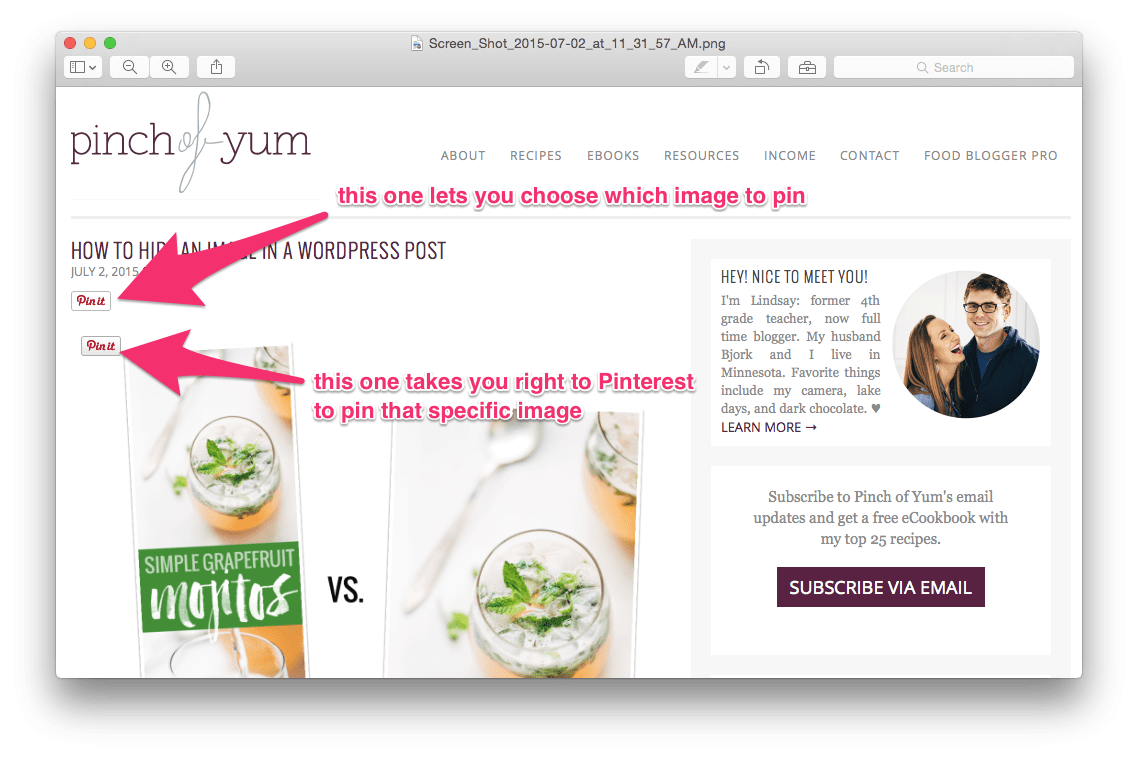
Question: How do you get the pin it button option where people can choose the image?
Answer: There are two different buttons – one goes over the images and one goes at the top of the post. The one at the top of the post gives you the option to choose whichever image you want to pin before jumping over to Pinterest.
Our button is custom, but you can get the same functionality where users can choose their image with this WordPress plugin (Pin It Button Pro).


Great tutorials, Lindsay!
Thanks Mary!
I just started creating the longer images, and I was trying to sneak them at the end, but thanks for saving me from being obnoxious! I will try this right away!
Glad it was helpful, Quelcy!
I love these posts! So helpful. Ever since my husband and I read about the long version versus short imagines, we’ve been going the long route with success! That was great advice.
Anything I can learn about code is fireworks wonderful to me =) And thanks for answering my questions (you too, Bjork’s mom) in one of your previous posts regarding random questions. So awesome =)
Oh my gosh, too cute! I’ll have to check the comments on that one – I didn’t see that!
I’m confused – why would you want to hide the image???
Hi Anne! We hide them so they don’t just hang out awkwardly at the end of the post. They don’t really fit the overall feel of the posts since they have text on them and they’re super long.
Oh my gosh, it’s like you read my mind or something with this post! I am JUST about to implement this on my site, so this tutorial is so helpful. I had create a template within InDesign (for some reason, I find it more intuitive than PS), but I hadn’t though of creating the template within LR! Thanks Lindsay!!!
InDesign?! Girl! That is intense. Way to go!
Thanks for sharing this great tip! I have been blogging for years but did not know about the “hide image div”. I have a question though: When I click on the PinIt button on the images on my blog, it does not open to a window where you choose which image to pin, it just goes straight to Pinterest. Is that dependent on the type of Pin button you use, or is it browser specific? (I use Chrome most of the time)
Hey Cattie! Yes – I think it’s the type of button – I linked a pin it button that should work for this at the end of the post! 🙂
Yes, that’s definitely it – I use a different plugin. Thank you so much!
Oh my gosh, it’s like you were reading my mind, thank you for the tutorial, perfect!
So glad to hear that Debra!
I have the same issue as Cattie. When I click on the Pin It button it goes directly to the photo that I clicked on, it doesn’t give choices. I also use Chrome.
Thanks for the awesome tutorial Lindsay!
Hey Linda! I think it’s the issue with the button – check out Pin It Pro (linked at the end of the post)!
Hi Lindsay … I’m not a blogger but couldn’t resist reading the whole article which was very interesting. And, it appears your numbers do not support what I’m about to say. While longer images do get my attention on Pinterest I almost always go to the website to pin in a single image because I’m not really concerned with repining and the longer images crowd my feed. Just a user perspective (:
I would have to agree! 🙂 But our numbers, for now, are showing that most still engage with the long ones!
The div style tag is probably one of the most important codes in HTML. You can use it to style anything even with bootstrap coding! I’m going to stop using picmonkey and make my images in Photoshop now.
DOOO IT! So much customization!
really great tutorial, lindsay!
Thanks Adrian!
This is so incredibly helpful. Thank you thank you! I am personally not a fan of the super long Pinterest images, but create them as you said — for another way to share and catch people’s eye on Pinterest. I use Pixlr online to create long images with text overlay, as I don’t have access to Photoshop right now. So glad to have a way to hide them from my posts now 🙂
Yep – exactly. I am not familiar with Pixlr! I’ll have to check it!
I was JUST wondering about this the other day. Super helpful — thank you for sharing!
So glad!
Be careful with this, Lindsay. Google has a tendency to see display:none in your CSS and assume that you’re up to some SEO trickery, which can raise red flags and cause your site to lose some credibility in the search engine’s eyes. So while this is helpful when it comes to creating Pinterest posts, it can hurt you elsewhere.
I’d recommend keeping an eye on your Google traffic to see if you spot any negative effect over time.
Good call Candace! I had not heard of this before you mentioned it, but I did some reading and video-watching and it looks like we are in the clear – seems like the general consensus is that unless you are actually stuffing the “display:none:” with links, keywords, etc., it’s a piece of code used commonly enough that it’s not a big deal. BUT. Really good to be aware of and definitely caused us to take a second look, so we’ll keep an eye on it! Thank you!
Hi Lindsay!! Thank you so much for posting these video tutorials I have been wanting to try and make my own but wasn’t sure how to get started. You definitely answered my question! Keep these posts coming, I LOVE them 🙂
Thanks Jenna! 🙂
i started doing this a while back but then someone else told me it was a no no for google. That they put you on the ban list. haha or something like that. Do you know if this is true?
Well, I sure hope we’re not on the ban list! haha! Seriously, though, we did some reading and video watching on the subject, and checked our analytics since we started doing this, and it seems like the general feeling is that if what you’re doing is on the up-and-up (not link stuffing, keyword stuffing, etc.) you will be okay. Our analytics for referral traffic from Google haven’t changed much since we started implementing this. But really good for us to know and watch!
Thank you so much for this post, Lindsay. This is something I’ve been wondering about lately as I’m starting my own blog (with lots of help from Food Blogger Pro). This tutorial was perfect and helps me a lot.
I’m so glad, Joy!
This is so incredibly helpful- thank you!! I was on your blog about 1 week ago realizing that somehow you achieved this miracle of miracles on your blog and now I know how you did it! Much appreciated because I also personally think the long pins make blog posts look tacky.
Thanks Sarah! Glad to hear that it was helpful!
I can’t believe you posted this today! Literally earlier this morning I was wondering how people we’re hiding their Pinterest images on their blogs. I was going to say something to my code-man (husband) tonight, and then you posted this! I took a pic of the code and sent it his direction. Thanks for sharing!
Code man! yes! 🙂 I love it.
Are you super-kidding me?? I just listened to you on SPI and had to check you out. I am totally trying this (both creating the longer posts, AND hiding it on my blog). Thanks!
Thanks Amy! 😀 Glad that you stopped by!
Hi Lindsay,
Thank you so much for a great post! I have just started my Japanese food and food photography blog and am learning a lot from your blog. TY TY TY!! I don’t have photoshop or lightroom and from your previous post, I was thinking to purchase lightroom as it sounds easier than photoshop. Is this only able to do with photoshop? or lightroom do same?
I haven’t found a way to put text and shapes on an image in LR the same way you can do with PS. But there are so many free softwares – I think LR is easier for a lot of people to learn, so I would start with that. Although I think now you can get a Creative Cloud membership for something like $10 for both softwares!
Thank you Lindsay.
I’ve actually found recently the display:none trick isn’t working well anymore… some pinit buttons/bookmarklets are catching on to the trick and now only show visible images. I’ve had to use some other css like absolute positioning and the like to ‘hide’ the image without actually hiding it. And knowing pinterest they’ll probably change that soon too, ha!
Weird. Ali told me it hasn’t been working on her site (which maybe you know about). 🙂 Do you know anything about the Google question – whether or not the display:none harms a site’s SEO? And yes – agreeing on Pinterest changing! always changing, always changing. 🙂
I’m not an SEO expert but I know people have been trying to game google for a long time, using text that’s the same color as the background or hiding text in various ways, methods that Google isn’t oblivious to and will penalize if they discover it. So I can’t imagine it’d help your SEO. But the absolute/negative positing could be seen as the same thing, so it may not be any better in that respect. Who knows!
Also – I’d love to know what that GORGEOUS script font is you used in the mojito collage? I’m digging brush fonts these days and can’t seem to get enough of them. 😉
It’s called Brushy! We’re using it as inspo for our redesign which is in the works now! 😀 There’s the alphabet, which is what I use, which is not a font, though, it’s like literally each letter is a PSD file which makes it a beast to use in these images. There’s also Brushy mini font which does type in like a normal font would, but not as cool looking in terms of the transparency and stuff.
Great info Lindsay! I use picmonkey to create mine but didn’t know how to hide them. This is great!
Thanks Julie! Glad to hear that!
such a helpful post!! def going to be putting this to use 🙂
Thanks Rachel! 🙂